Nowadays you can meet an increasing number of people who consider dogs as members of their family. Of course, everyone who has such a friend at their disposal treats them well and always tries to help in any difficult situation.
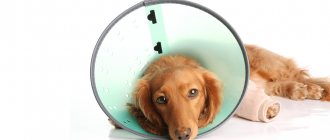
Sometimes on the street, when owners are walking with their pets, you can see what seems to be an unusual structure on the animals’ necks, the so-called cone. People immediately have many questions about this. Let's figure out why dogs wear a cone around their necks .
Such a cone is not any kind of decoration, but, on the contrary, performs an important medical function. It is usually worn after various operations, medical procedures or illnesses in order to limit the dog's head access to wounds or other injuries. This collar can be used if the dog's ears or skin are treated with medicine. The cone prevents the animal from licking and scratching its wounds. This helps get rid of infection in the stomach and also reduces the time required for healing.
The protective collar must be selected in size, in accordance with the diameter of the neck, then it will not interfere with the dog at all. It won't be a problem for her to walk and eat normally. It is advisable to start training your dog to use such a cone in advance, at least a week before medical interventions.
Why or why do dogs and cats wear a cone around their neck?
A cone or protective collar is indeed sometimes placed on dogs. But this is a forced and temporary measure that is necessary for dogs, or rather for their protection. Such a collar is usually made of flexible plastic (branded) or cardboard (homemade). It does not particularly restrict the dog’s movements, but still prevents it from performing certain actions. When is it indicated for dogs?
Not all dogs like this “decoration”; some begin to actively resist, so you need to gradually accustom the dog to the collar. It is usually removed when eating. I made such a collar for my cats with ear mites, lichen lesions, and after operations. In principle, animals get used to it quite quickly and can wear it, if necessary, for quite a long time.
Typically a medicated collar is placed on dogs or cats to prevent licking. For example, after castration or other surgery. By licking the animal, it irritates the sore spot, it becomes infected with pathogenic bacteria and fungi, and eczema can develop. Such a collar deprives our pets of peripheral vision and they will bump into furniture and doors, so in such cases it is better to wear it when the animal is left alone at home. I believe that you should not wear such a collar on walks - the dog is already under supervision on a leash. When I treat a dog’s ears or eyes, there is no need to wear such a collar. After treatment, the dog feels better and does not scratch with its paws. Although everything is very individual.
Good day! Most often this happens due to some kind of disease in the dog; the cone is put on them so that the dog cannot hurt itself and make the disease much more severe. But the dog will still be mentally traumatized when wearing a cone and will be limited in its actions.
The animals are given a cone to prevent them from scratching their wounds. My pit bull terrier's ears hurt, or rather not inside, but some kind of infection that caused sores. Therefore, in addition to medications, it was recommended to wear a cone to prevent it from scratching the wounds.
The need for a protective collar
The collar is commonly used on dogs following surgery. It prevents wounds from being licked, which helps speed healing. Such use is typical for the recovery period after abdominal surgery, castration, and sterilization. The collar prevents animals from chewing the suture threads, which may require additional processing and treatment.
Why else do they put a cone around a dog’s neck?
- If the dog has otitis media or ticks. This will protect his ears from the wounds that form from constant scratching.
- After treating scratches and ulcers with special ointments, which should not be touched until completely dry.
- When using flea products. Some time must pass after application for them to become safe.
Why is it needed?
The protective collar has a cone shape. The device limits the cat’s mobility and acts as a means of protection. Thanks to the collar, the animal will not be able to lick wounds on the skin or stitches after surgery, remove splints for injuries, or lick medications applied to the body. Veterinarians advise wearing a collar in the following cases:
- After castration. By licking a sore spot, a cat can provoke bleeding and destroy the applied antiseptic.
- For skin wounds. By licking the damaged area, the pet prevents its healing.
- Other surgical interventions. It is necessary to prevent the animal from chewing the stitches applied by the veterinarian.
- Ear pain. The pet begins to scratch them, which can cause additional infection and remove veterinary medications from the ear cavity.
- Presence of fleas and ticks. The purr is treated with a pharmaceutical agent against parasites. These substances, if ingested, can cause poisoning. In addition, the antiparasitic agent will not have the expected effect.
- Hair and nail trimming. If the cat has an aggressive character, a collar is needed to protect the owner from bites.
Product options and their features
There are several options for dog neck collars, from which you can choose the most suitable one:
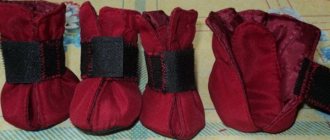
- Soft. They are easy to use, do not interfere with the animal, and are comfortable to eat and sleep in. Such collars do not make frightening sounds when they hit, for example, the floor and walls. But they are not suitable for large dogs.
- Inflatable. They are easy to transport and do not interfere with the animal. Suitable for pets with short limbs.
- Plastic. Such collars are inexpensive and accessible and are sold in every pet store. They are transparent, thanks to which the animal sees everything that is happening around them, and are easy to clean. But they are quite noisy, which often frightens dogs.
The plastic collar is inexpensive but comfortable
Types of devices
After castration, the cat must wear a protective collar. It is important to take great responsibility when choosing a product. When choosing a device, take into account the structure and weight of the animal. The main criterion is neck circumference. The pet should feel comfortable, so the collar should not be tight or loose. The gap in the neck area is no more than two fingers. There are 3 types of collars available in pharmacies and pet stores:
- plastic;
- inflatable;
- soft.
Return to contents
Plastic
Plastic products are a truncated cone with ties that secure the collar. To reduce discomfort, the edges are treated with soft fabric or lacing. Fixation tapes can be replaced with Velcro. The cone-shaped shape does not interfere with the pet's eating, drinking water and sleeping. The animal gets used to this attribute in 2-3 days.
When choosing a plastic collar, you should choose a product made of a more transparent material, which will provide your pet with a good lateral view and will not interfere with free orientation in space. All this will make the cat less nervous and irritated. Such products are distinguished by their practicality, simple disinfection method and low price. However, not all cats feel comfortable with a plastic device. If your pet takes off its collar, you need to hold it in your arms for a while and treat it with something tasty. It is better to remove the collar for a short time while eating. If your pet is irritable and restless, it is recommended to purchase a different type of product.
Inflatable and soft
Devices of the first type are much more convenient for cats. They are made in the form of a roller or circle from a material that is easy to clean. Such collars do not irritate the skin, do not cause allergic reactions, and do not interfere with full vision. The only drawback is the price of the device. It greatly exceeds the cost of plastic. If we talk about soft collars, they are made of non-woven materials on a water-repellent basis and have a cone shape. It is not difficult to put the product on an animal. The pet feels quite comfortable in it. No allergies are observed when wearing it. The cost, unlike inflatable, is more affordable. For very active cats, these collars are the least practical because they can remove even tight collars and get to the sore spot.
What is needed to make a collar
You can make a cone for a dog’s neck yourself using available materials:
- thick cardboard;
- plastic bottles;
- foam;
- felt.
You will also need scissors, tape or adhesive tape, shoelaces, and possibly a stapler.
The main thing is to take the correct measurements so that your pet is comfortable. To do this you need to find a centimeter.
Note! Some people use a plastic bucket to create a post-op collar, making a hole in the bottom for the head. But such an invention is inconvenient for the animal, especially if it is much longer than the muzzle. In addition, the bucket will make noise, scaring the dog.
How to make a cat collar yourself
If your animal is uncomfortable in a purchased veterinary collar or it does not fit in size, or maybe you want to save money or you are irresistibly drawn to create, you can make a protective cone for your cat yourself. Here are a few simple options.
The dimensions and details of a homemade veterinary collar will vary in each individual case.
Making a plastic cat collar
For this you will need a stationery folder. Using scissors, it can be easily turned into an oilcloth canvas of suitable size, light and transmitting light. Another suitable material is a flexible cutting board: it does not allow light to pass through, but is much denser.
You will also need a sheet of paper (maybe A4 or a regular double-sheet from a school notebook), a ruler, a compass, a pencil, tape or wide adhesive tape, scissors, a stapler (with a wide staple if possible) and a textile fastener (also contact tape or just Velcro ).
You can make a veterinary collar for a furry pet as follows:
- For the pattern, take two measurements: neck circumference and the distance from the tip of the nose to the neck in a straight line.
- Then, on a previously prepared piece of paper, draw two circles with a single center. The smaller one is the neck circumference, the larger one is the distance from the nose to the neck plus 3 cm in reserve.
- Inside the smaller circle with an indentation of 3–4 cm, draw another circle: the fasteners for the collar will be located here.
- Cut out the pattern along the larger circumference, measuring 2-3 cm in reserve in case of inaccuracies in size; after trying on, the product can be made shorter.
- Next, cut the pattern straight from the edge to the center.
- Next, cut out the smallest circle.
- Make 5-6 cuts towards the middle circle so that you get stripes - these will be loops.
- The material between future loops must be removed.
- The finished pattern can be tried on an animal. If necessary, make adjustments.
- Then use a marker to transfer the pattern onto a plastic sheet.
- The strips for the loops must be folded in half, secured with a stapler and wrapped with a wide plaster (it is best suited for this purpose) so that the sharp edges do not cause discomfort to the animal.
- Close all other edges and staples in the same way.
- Secure the textile fastener with staples; for reliability, you can take a piece of Velcro up to 10 cm. The fastener is attached along the cut line with an overlap of 1–2 cm.
- All that remains is to thread a bandage or collar through the loops, put the structure on the animal and secure it with Velcro.
Please note: the collar should not fit too tightly to the cat’s neck; you should be able to slip your finger under it without unnecessary effort, otherwise the product will rub the animal’s skin. However, the collar should not hang too loosely, otherwise the animal will be able to remove it.
Making a protective cone from plastic with your own hands - video
Making a veterinary collar from cardboard
A homemade collar made of cardboard will come in handy if you don’t have a ready-made cone at hand, and you need to limit the animal’s ability to lick or comb itself right now.
To do this, take a sheet of cardboard. Any cardboard box that can be cut will do. Just don’t forget to wipe it first. The dimensions are taken similarly to the previous version, however, the loops are not made on the collar itself, but are additionally cut out of cardboard and glued to the outside of the product.
For fixation, you can use lacing, making holes in the cardboard with an awl or a gypsy needle. You can also attach Velcro. All sharp edges must be covered with tape or tape.
If your pet urgently needs a veterinary cone, but there is no way to buy one right now, you can make a protective collar from cardboard
This design is not very reliable, but it will definitely last for several days, during which you can do something more substantial or buy a ready-made collar.
Making a protective cone from cardboard with your own hands - video
In the video they make a collar for a dog, but it differs from a cat's only in its smaller dimensions.
Making a cat collar from fabric
The fabric collar is made in a manner similar to the previous versions, but the cardboard or plastic frame of the cone is covered with a kind of fabric cover made of cotton or linen.
To make your animal more comfortable in a homemade collar, you can cover the cardboard or plastic frame of the cone with fabric
The fabric pattern is made according to the same patterns as the frame, with the addition of 1 cm for the possibility of subsequent stitching. Using the pattern, two identical elements are cut out and sewn together around a rigid frame. The edges of the collar along the cut line are secured with Velcro. Lacing or loops for the collar are made on the inner edge.
The advantage of such a collar is its softness and aesthetics, but functionally it is no different from the options described above.
Manufacturing process
Before creating a pattern, you need to measure the girth of the dog’s neck and the length of the head. Then you need to take the material from which you plan to make it.
Step-by-step instructions for creating a pattern:
- A dot is placed in the center of the prepared material; you will need to draw three circles.
- The radius of the first is found as the ratio of the neck circumference to the number 6.28.
- The second one is drawn larger than the previous one. To the radius of the previous one you need to add a second value - the length of the head. Measure the resulting number from the center of the circle. This will be the radius of the new circle. You can add a few more centimeters. It is better to make a collar with a margin and, if necessary, shorten it in the future.
- The smallest circle is 4-6 centimeters smaller in diameter than the first. You will need it to make fastenings on the collar.
Then you need to cut out a large circle. Next, draw a line on the product from the center to any point on the resulting circle. Then you need to make a cut along this line. You will get a strip or an unfolded product. Next, you need to cut out the smallest circle and make notches from it to the middle one. They can be folded, attached to the base, and threaded through them, for example, a lace.
From a plastic bottle
For your dog, you can make a protective cone from a bottle that holds five liters of water.
How to make a dog collar with your own hands:
- Cut a plastic strip and fold it into a funnel shape.
- Fix the edges, they should fit snugly against each other. To do this, use tape or adhesive tape.
- To tie the collar, you need to make several holes in the plastic using an awl. All that remains is to thread the lace through the holes.
What to replace it with?
You can make a collar for a cat after castration yourself from scrap materials. Transparent, loose plastic, cardboard, or fabric are suitable for this. The pattern of a cone-shaped collar is not difficult to make. Initially, a semicircle is cut out, the diameter of which is 20-25 cm. Then the part is rolled into a funnel and a hole is cut out at the base, equal to the circumference of the cat’s neck. The sides are stapled or framed with ribbons.
To avoid injuring the cat, the edges of a product made of plastic or cardboard should be covered with tape or adhesive tape. A quick solution to the problem is to use disposable tableware. The plate must be cut in one place towards the center. Then cut a circle in the middle corresponding to the diameter of the pet’s neck. This slit will help you easily put on the resulting collar. Secure the incision with tape or a stapler. It is acceptable to use both plastic and paper disposable plates. But it is worth remembering that protective collars made of paper are short-lived. The edges of the vessel are also treated with adhesive tape.
Sources:
https://vplate.ru/koshki/vorotnik/ https://vashipitomcy.ru/publ/zdorove/kastracija_i_sterilizacija/vorotnik_dlja_kota_posle_kastracii_kakoj_vybrat_kak_sdelat_svoimi_rukami/17-1-0-2255 https://infokotiki.ru/sterilis/skolko-nuzhno -nosit -vorotnik-kotu-posle-kastratsii.html
How to put the product on a dog
You cannot immediately put the protective cone on your dog. First, you need the animal to get used to it, smell it, and examine it from all sides. Let the dog see it disassembled.
When she gets used to the new item and stops being afraid of it, you need to carefully put it on. It is better that the pet does not stay in it for too long the first time. Therefore, after some time, you need to remove the postoperative collar, observing the behavior of the animal.
Note! It must be shown that the product does not interfere with normal activities, for example, playing with a dog if its condition allows it.
A collar that doesn't get in the way won't irritate your dog
How long should a cat wear a collar?
Castration of cats is considered a simple operation. However, as after any other surgical intervention, the pet requires careful and proper care. The postoperative wound is small, and the sutures are predominantly self-absorbing. Waking up after anesthesia, the cat will try to lick the wound. If you give him this opportunity, it will take a long time to heal. In addition, infection may occur. Based on this, veterinarians insist that the cat needs to wear a medical collar for the entire rehabilitation period. This process can last 7-14 days. The duration of wearing depends on the individual characteristics of the pet’s body, its age and state of health. They put the collar on the pet while he is still under anesthesia.
The more attentive the owner is to the cat, the faster the seam will heal and the need to wear a protective device will disappear.